Bi-Directional Tax Integration Guide
Getting Started
New App Center Partners: Your company must have entered into a commercial agreement with us. If you have not yet entered into an agreement, review the information on the Build App Center Solutions page.
Existing App Center Partners: The SAP Concur Platform team will need to configure your existing sandbox, among other things to enable access. You can make that App expansion request by contacting your Alliance Manager.
Products and Editions
Concur Expense Professional Edition
Prerequisite
Partners must have completed the migration to the Expense V4 APIs.
SAP Concur Expense Configuration
-
VAT must be configured for the supported VAT countries.
-
Configure Expense Workflow with the Pending External Validation step.
Scope Usage
Development Environment
SAP Concur Certification Project Manager will prepare the development environment for you and send the development environment details to you by email. The development environment includes:
Sandboxes and Accounts
-
You will have a sandbox on each of following SAP Concur data centers: US2 and EU2.
-
You will have 3 test accounts on each of following SAP Concur data centers: US2 and EU2.
Development App
A development app will be created for you by your assigned Certification Project Manager. They will send you a deep link (URL) to the development app along with the app client_id and client_secret. These are provided for development and testing purposes only.
Production App
-
Once you complete the development app certification walkthrough, you will be provided with a production app
client_idandclient_secret. -
You need to send the production app’s connect URL (redirect URL) to your Certification Project Manager before starting the development and testing of the production app.
-
The Certification Project Manager will provide you the deep link (URL) to the production app listing in the App Center. You will be able to access the app listing for development and testing purposes only. After your production app meets all the certification requirements and completes certification, the App Center marketing team will release it in the App Center and users in the allowed regions/countries will have access.
App Center Flow - Connecting from SAP Concur App Center
A company level authentication using password grant allows a company administrator to establish a connection from App Center. The user administrator needs to login via their SAP Concur credentials to access the app in the App Center. In the development and testing phase, you will be provided with the app listing solely for the purpose of development and testing. This app listing will be accessed via a deep link. This deep link will be provided to you before you start development.
Quick Connect describes the process customers use to connect their SAP Concur site with an App Center Partner’s Enterprise application. See the Quick Connect scope document for details to guide you through the development of this required piece of your certified application.
Integration Flow
Prior to connecting customers with the integration, you must create a subscription to the Event Subscription Service.
For more information:
Prerequisite
You must provide an endpoint to receive Event Notifications.
Step 1: Obtain an access token using the client_credentials grant.
Request
POST /oauth2/v0/token HTTP/1.1
Host: us2.api.concursolutions.com
Content-Type: application/x-www-form-urlencoded
client_id={your-app-client-id}
&client_secret={your-app-client-secret}
&grant_type=client_credentials
Response
{
    "expires_in": 3600,
    "scope": "receipts.read company.read document.tax.compliance.read
              events.topic.read openid receipts.write",
    "token_type": "Bearer",
    "access_token":
"eyJraWQiOiIxNDU1NjE0MDIyIiwiYWxnIjoiUlMyNXYiLCJ0eXAiOiJKV1QifQ5eyJjb25jdXIuc2NvcGVzIjpbInJlY2VpcHRzLnJlYWQiLCJjb21wYW55LnJlYWQiLCJkb2N1bWVudC50YXguY29tcGxpYW5jZS5y..AgZTrAv3eFLKdLGCDd5kfh-nLlVkoXqsNsqJsu7QtOomQzLTUSljOUCczFbzjCCT5mHCWg",
    "geolocation": "https://us2.api.concursolutions.com"
}
Step 2: GET a list of event topics.
Verify that you have sufficient access to the topic.
Request
GET /events/v4/topics HTTP/1.1
Host: www-us2.api.concursolutions.com
Authorization: Bearer {access_token}
Response
[
    "public.concur.document.tax.compliance",
    "concur.travel.search",
    "public.test",
    "public.concur.travel.search"
]
Step 3: Create a subscription.
Request
PUT /v4/subscriptions/webhook HTTP/1.1
Host: www-us2.api.concursolutions.com
Authorization: Bearer {access_token}
Content-Type: application/json
Response
{
  "id": "partner.dev.expense",
  "filter": "MX.compliance",
  "topic": "public.concur.expense.report",
  "webHookConfig": {
    "endpoint": "https://www.partner-url.com/cfdi-validation"
  }
}
Response
{"message":"Subscription 'partner.dev.cfdi' saved successfully"}
Manage Subscriptions
GET List of Subscriptions
Request
GET /events/v4/subscriptions HTTP/1.1
Host: www-us2.api.concursolutions.com
Authorization: Bearer {access_token}
Response
[
    {
        "allowPublicAccess": true,
        "startFromEarliest": false,
        "id": "partner.dev.cfdi",
        "topic": "public.concur.expense.report",
        "filter": ".*",
        "webHookConfig": {
            "endpoint": "https://concur-connect.com/eventlistener"
        },
        "applicationId": "646a2999-1643-111-8be6-84534f5b41fc",
        "scope": "",
        "groups": [],
        "companyIds": [
            "d6a72a3f-fdee-450a-abb3-7bf5eb427440"
        ]
    }
]
DELETE Subscription
Request
DELETE /v4/subscriptions/partner.dev.cfdi HTTP/1.1
Host: www-us2.api.concursolutions.com
Authorization: Bearer {access_token}
Response
{
    "message": "Subscription 'partner.dev.cfdi' marked for deletion"
}
Step 4: Repeat Step 1 for the EU2 data center using the host URL https://www-eu2.api.concursolutions.com.
NOTE: Customers that are connected will be listed under the
companyIds. A subscription must be created prior to connecting customers; otherwise, customers will not be retroactively enabled on a subscription. Event Notification Example
{
    "id": "9bd2307c-654c-48a2-a6cf-49a3c5877d4e",
    "correlationId": "681c40fa4f4db1306b14178d6966c9cd",
    "eventType": "statusChanged",
    "topic": "public.concur.expense.report",
    "timeStamp": "2025-03-13T20:23:16.084Z",
    "data": null,
    "facts": {
        "currentApprovalStatus": "A_EXTV",
        "reportId": "B70704EEE71B4A1BA2DF",
        "stepCode": "PARTNER",
        "lastModifiedDate": "2025-03-13T20:23:16.084Z",
        "userId": "046b3a2d-081b-482c-9168-86f69ca3fd57",
        "previousPaymentStatus": "P_NOTP",
        "companyId": "e693e3d8-00f5-4e8d-9b87-9b42896e01bd",
        "processId": "EFEA6991DD648348B2A624EEC3810090",
        "currentPaymentStatus": "P_NOTP",
        "startingStep": {
            "roleCode": "EXTERNAL_SYSTEM",
            "stepInstances": [
                {
                    "id": "DA8DBC3AED58D343B54D2A9CB848CD1E"
                }
            ]
        },
        "previousApprovalStatus": "A_ACCO",
        "href": "https://us2.api.concursolutions.com/expensereports/v4/users/da9bd2c4-8bf6-41cb-b442-d3d5f0d46703/context/TRAVELER/reports/B70704EEE71B4A1BA2DF"
    },
    "groups": null,
    "scopes": null
}
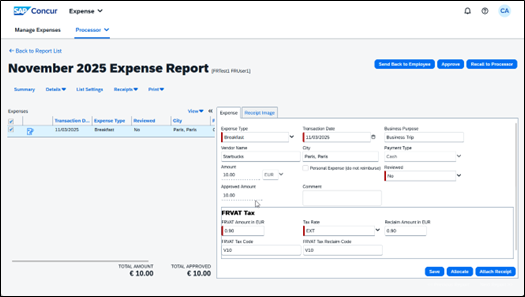
Update an Expense Entry VAT Data
Filter for Expense Reports that are on a Pending External Validation step and the Step Code configured for your integration.
Step 1: GET Expense Report
Request
GET /expensereports/v4/users/8fcd4644-efaa-47ee-9925-f824f36cbf24/context/TRAVELER/reports/A28DCD19E0574796B52D HTTP/1.1
Authorization: Bearer
Host: us2.api.concursolutions.com
Response
{
  "approvalStatus": "Pending External Validation",
  "approvalStatusId": "A_EXTV",
  "concurAuditStatus": "NOTR",
   ...
  "ledger": "DEFAULT",
  "ledgerId": "2703E3FBD393DA4484ED3CB07303407C",
  "paymentStatus": "Not Paid",
  "paymentStatusId": "P_NOTP",
  "submitDate": "2025-11-05T21:28:36Z",
   ...
  "reportId": "A28DCD19E0574796B52D",
  "currency": "Euro",
  "currencyCode": "EUR",
  "analyticsGroupId": "C8CB395275EC4FE9AF6CD5B535EA2B17",
  "hierarchyNodeId": "26551AFE2EBAF242BB0D1BE6C31B18F0",
  "allocationFormId": "FD7E9C6389EF495B85042319D58CAE53",
  "links": [
    {
      "rel": "self",
      "href": "https://us2.api.concursolutions.com/expensereports/v4/users/8fcd4644-efaa-47ee-9925-f824f36cbf24/context/TRAVELER/reports/A28DCD19E0574796B52D",
      "method": "GET",
      "isTemplated": false
    }
  ],
  "reportDate": "2025-11-05",
  "reportFormId": "674B67F0C6BD4E9CA5D91AFB82CC8ABB",
  "businessPurpose": "November 2025 Expense Report",
  "countryCode": "FR",
  "countrySubDivisionCode": null,
  "policyId": "D82BECB85616674F9859313F066F0197",
  "startDate": null,
  "endDate": null,
  "name": "November 2025 Expense Report",
  "policy": "EMEA Expense Policy",
  "country": "FRANCE",
  "hasReceivedCashAdvanceReturns": false,
  "receiptContainerId": null,
  "userId": "8fcd4644-efaa-47ee-9925-f824f36cbf24",
  "reportType": "Regular",
  "redirectFund": null,
  "creationDate": "2025-11-05T21:22:32Z",
  "canRecall": false,
  "reportVersion": 0,
  "reportNumber": "T3TGUL",
  "cardProgramStatementPeriodId": null,
  "canAddExpense": false,
  "isSubmitted": true,
  "isSentBack": false,
  "sponsorId": null,
  "submitterId": "8fcd4644-efaa-47ee-9925-f824f36cbf24",
  "taxConfigId": "DBC3CA22FC3BAD4CA8A84989F947C3E7",
  "defaultFieldAccess": "RO",
  "employee": {
    "employeeId": "FRTestUser1"
  },
  "receiptStatus": "NOT_REQUIRED",
  "imageStatus": "RECEIVED_NOT_REQUIRED",
  "isPendingDelegatorReview": false,
  "isPaperReceiptRequired": false,
  "isReportEverSentBack": false,
  "hasBlockingExceptions": false
}
Step 2: GET Expense Entries
Request
GET /expensereports/v4/users/8fcd4644-efaa-47ee-9925-f824f36cbf24/context/TRAVELER/reports/A28DCD19E0574796B52D/expenses HTTP/1.1
Authorization: Bearer
Host: us2.api.concursolutions.com
Response
[
  {
    "allocationSetId": null,
    "allocationState": "NOT_ALLOCATED",
      ...
    "businessPurpose": "Business Trip",
    "ereceiptImageId": null,
    "expenseId": "43E5175DE3046A4C8D1B27EC42BC963B",
    "parentExpenseId": null,
    "expenseSourceIdentifiers": {
        ...
      "receiptImageId": "2E18099C3C964EB890887C6410B0F2B8",
      "expenseCaptureImageId": null,
      "quickExpenseId": null,
      "personalCardTransactionId": null,
      "receipts": null,
      "creditCardTransaction": null,
      "ereceiptId": null,
      "ereceiptURL": null
    },
    "expenseType": {
      "id": "BRKFT",
      "name": "Breakfast",
      "code": "MEALS",
      "isDeleted": false,
      "listItemId": null
    },
      ..,
    "hasMissingReceiptDeclaration": false,
    "isAutoCreated": false,
    "imageCertificationStatus": null,
    "isImageRequired": false,
    "isPaperReceiptRequired": false,
    "isPersonalExpense": false,
      ...
    "location": {
      "id": "3E114E21BFF94BF2BCEC785C088434D3",
      "name": "Paris, Paris",
      "city": "Paris",
      "countrySubDivisionCode": "FR-75",
      "countryCode": "FR"
    },
    "links": [
      {
        "rel": "self",
        "href": "https://us2.api.concursolutions.com/expensereports/v4/users/8fcd4644-efaa-47ee-9925-f824f36cbf24/context/TRAVELER/reports/A28DCD19E0574796B52D/expenses/43E5175DE3046A4C8D1B27EC42BC963B",
        "method": "GET",
        "isTemplated": false
      }
    ],
    "paymentType": {
      "id": "CASH",
      "name": "Cash",
      "code": "CASH"
    },
    "postedAmount": {
      "value": 10,
      "currencyCode": "EUR"
    },
    "receiptImageId": "2E18099C3C964EB890887C6410B0F2B8",
    "ticketNumber": null,
    "transactionAmount": {
      "value": 10,
      "currencyCode": "EUR"
    },
    "transactionDate": "2025-11-03",
    "travelAllowance": {
      "dailyLimitAmount": null,
      "dailyTravelAllowanceId": null,
      "isExpensePartOfTravelAllowance": false
    },
    "vendor": {
      "id": null,
      "name": null,
      "description": "Starbucks"
    },
    "fuelTypeListItem": null
  }
]
Step 3: GET Expense Entry Receipt Image
Request
GET /spend-documents/v4/receipts/representations?imageId=2E18099C3C964EB890887C6410B0F2B8&companyId=59c0bc01-d608-4b97-8a67-2559f5b29a08&type=display HTTP/1.1
Authorization: Bearer
Host: us2.api.concursolutions.com
Response
200 OK
Step 4: GET Expense Entry Tax
Request
GET /expensereports/v4/reports/A28DCD19E0574796B52D/expenses/43E5175DE3046A4C8D1B27EC42BC963B/taxes HTTP/1.1
Authorization: Bearer
Host: us2.api.concursolutions.com
Step 5: PATCH Expense Entry Tax
Request
PATCH /expensereports/v4/reports/A28DCD19E0574796B52D/expenses/43E5175DE3046A4C8D1B27EC42BC963B/tax/3375C436484FF645ABE03C2E7478C8D6 HTTP/1.1
Authorization: Bearer
Content-Type: application/json
Host: us2.api.concursolutions.com
Content-Length: 130
{
      "reclaimCode": "V10",
      "reclaimTransactionAmount": 0.90,
      "taxCode": "V10",
      "taxTransactionAmount": 0.90
}
Response
204 Not Content
Step 6: PATCH Expense Workflow Action
Request
PATCH /expensereports/v4/reports/A28DCD19E0574796B52D/approve HTTP/1.1
Authorization: Bearer
Content-Type: application/json
Host: us2.api.concursolutions.com
Content-Length: 27
{
  "comment": "Approved"
}
Response
204 Not Content
SAP Concur Expense Workflow Configuration
Permissions
A company administrator may or may not have the correct permissions to use this feature. The administrator may have limited permissions, for example, they can affect only certain groups and/or use only certain options (view but not create or edit).
If a company administrator needs to use this feature and does not have the proper permissions, they should contact the company’s SAP Concur administrator.
Also, the administrator should be aware that some of the tasks described in this guide can be completed only by SAP Concur. In this case, the client must initiate a service request with SAP Concur support.
Concur Expense Workflow Setup Guide
Procedure
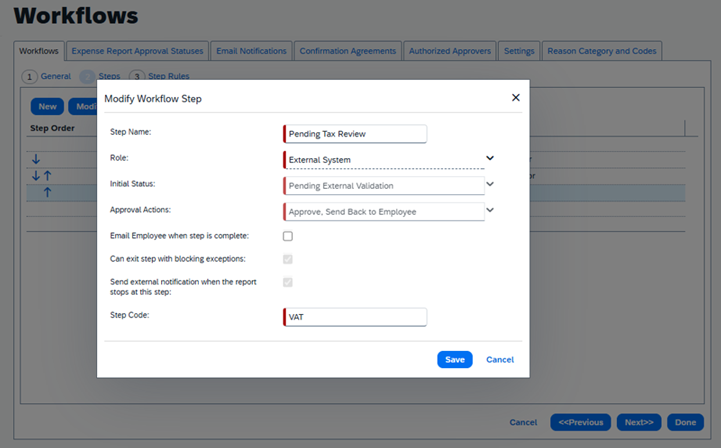
Step 1: Copy/Modify the workflow that will be used for the integration. Add a Pending External Validation step to the workflow as the last step.
NOTE: Updates to an Expense Entry Tax data can only be made while an Expense Report is on a Pending External Validation step.
Step Name: Pending Tax Validation Role: External System Initial Status: Pending External Validation Approval Actions: Approve, Send Back to Employee Step Code: <unique identity for your integration, e.g. VAT>
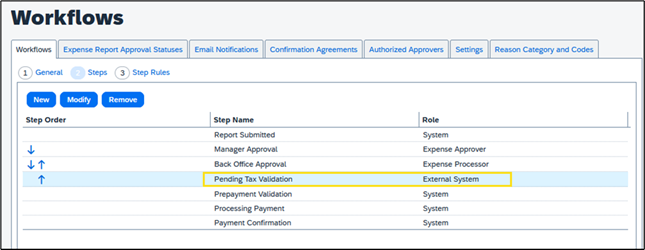
Step 2: Apply Workflow to the Expense Policy.
NOTE: To add existing customers to your Event Subscription, the App must be disconnected and reconnected. New customers connecting will automatically be added to your Event Subscription.
SAP Concur Expense Tax Configuration
Permissions
A company administrator may or may not have the correct permissions to use this feature. The administrator may have limited permissions, for example, they can affect only certain groups and/or use only certain options (view but not create or edit).
If a company administrator needs to use this feature and does not have the proper permissions, they should contact the company’s SAP Concur administrator.
Also, the administrator should be aware that some of the tasks described in this guide can be completed only by Concur. In this case, the client must initiate a service request with SAP Concur support.
Procedure
Step 1: Navigate to the Tax Administration page. To Create a Tax Configuration, click New.
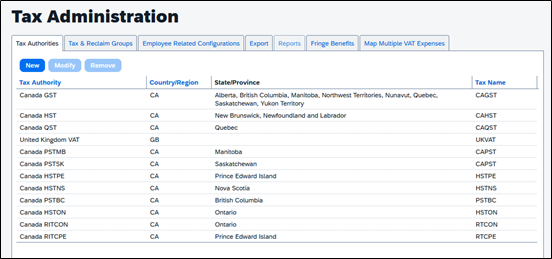
Step 2: As an example, create a Tax Configuration
Tax Authority Name: France VAT Country/Region: France Tax Name: FRVAT
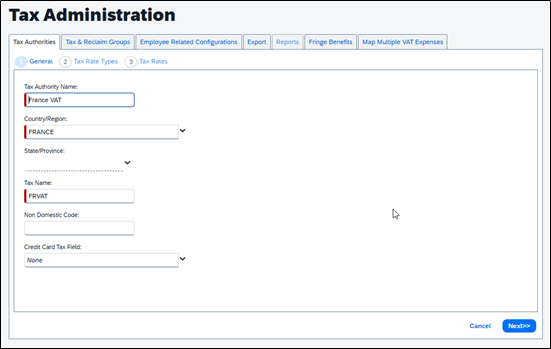
Click Next.
Step 3: Create the following for the Tax Rate:
Tax Rate Type Name: EXT Calculation Method: Percentage
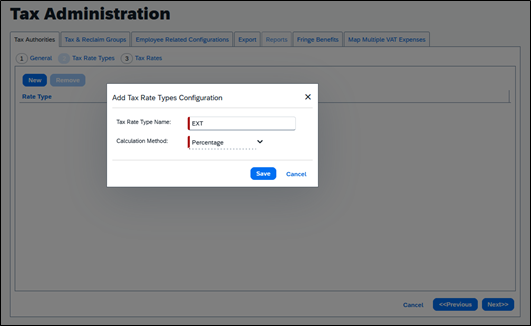
Click Save, then Next.
Step 4: Add a Tax Rate
Rate Type: EXT
Effective Date:

Click Save, then Done.
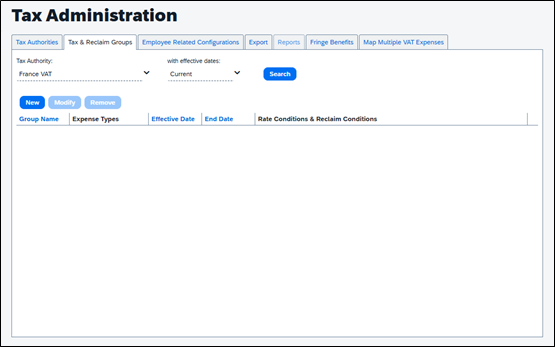
Step 5: Navigate to the Tax & Reclaim Groups Tab. Create a Tax Reclaim Group.
Step 6: For example, create a New Tax Reclaim Group for the France VAT.
Group Name: All (Partner Name)
Effective Date:
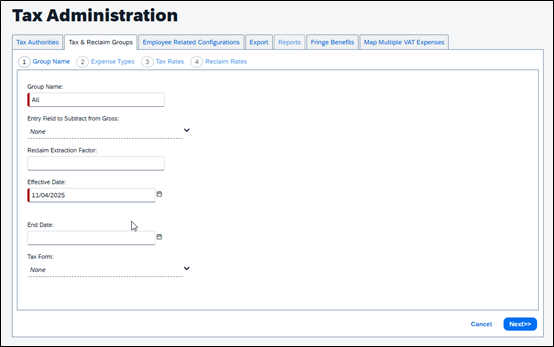
Click Next.
Step 7: Select All Expense Types.
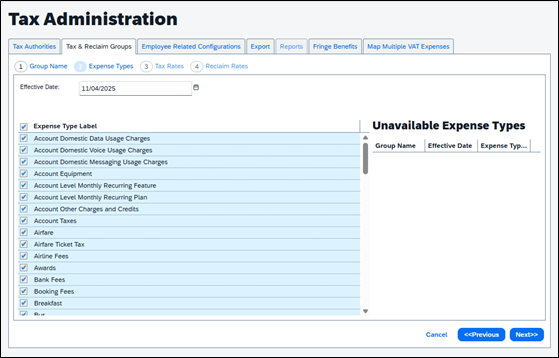
Click Next.
Step 8: Use the Default Tax Rate configuration (do not add a Tax Code)
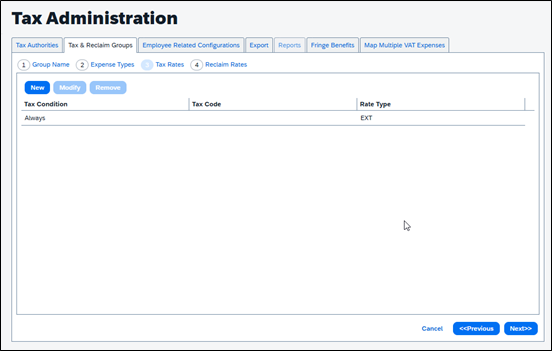
Click Next.
Step 9: Use the Default Reclaim Rates configuration.
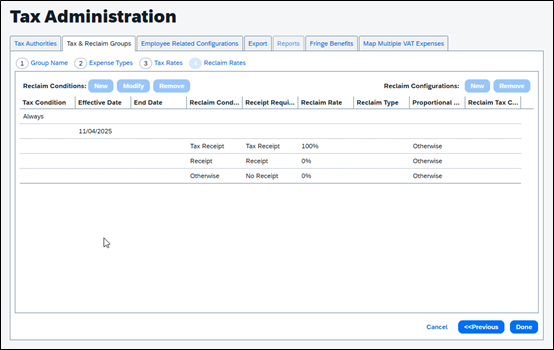
Click Next, then Done.
Step 10: Navigate to the Employee Related Configurations tab. Create a New Configuration. For example, France.
Configuration: France Tax Data on User Form: Hidden
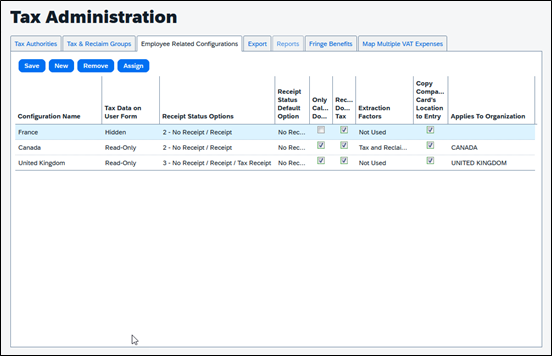
Click Save.
Step 11: Assign the configuration to France.
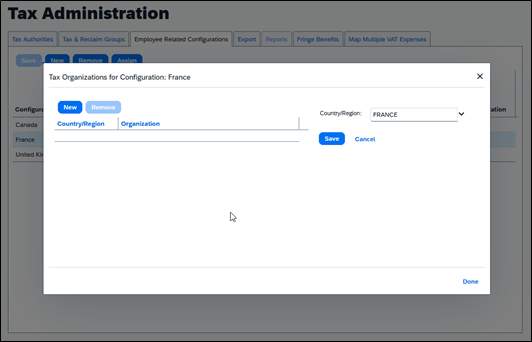
Click Save, then Done.
Step 12: Repeat steps to create similar configuration for other countries using the bi-directional integration.
Expense Tax Update Example:
User creates and submits an Expense Report
- Prior to Tax Update
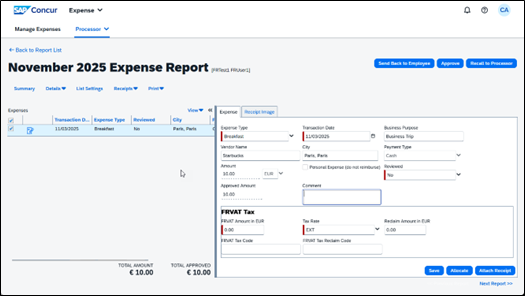
- After Tax Update